Underfloor Heating Leak Detection: The Signs, How the Loop Is Found and What Repair Involves
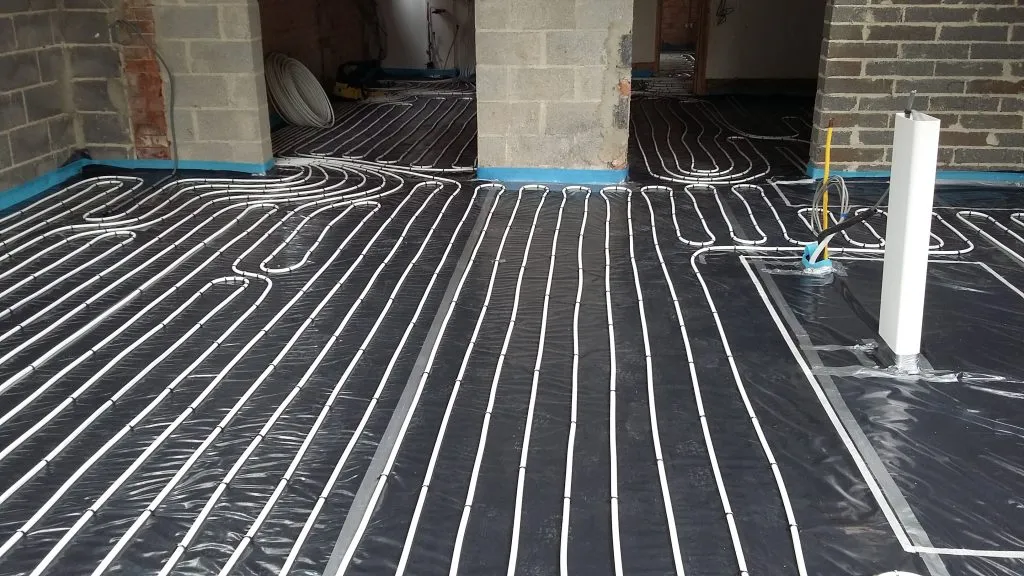
An underfloor heating leak is hidden by definition, so the diagnosis has to be built from pressure behaviour at the manifold rather than from anything visible. Here is how the failed loop is identified and how the point in it is found.
How an underfloor heating leak announces itself
Underfloor heating leaks are unusual among domestic leaks because the pipework is completely inaccessible and, in a screeded floor, embedded in a material that absorbs and spreads water rather than letting it run. The result is that the symptoms are indirect and easy to misread, and the first visible sign frequently appears somewhere that is not above the leak at all.
The reliable indicator is pressure. A wet underfloor system is a sealed circuit and it should hold its pressure indefinitely once commissioned and vented. A system that needs repressurising repeatedly is losing water somewhere, and unlike a radiator system there is nowhere for that water to weep visibly.
Pressure that will not hold on the manifold
The manifold is where the diagnosis begins, because it is the only place the system can be broken down into parts. Each loop has its own flow and return isolation, so loops can be shut individually and watched. A system that holds pressure with every loop closed and loses it with one loop open has told you which circuit has failed, and that single test converts an entire floor area into one pipe run.
Distinguish this from ordinary post-commissioning settling. A newly filled system loses a little pressure as dissolved air comes out of solution and is vented, and that settles within the first days or weeks. A pressure loss that continues month after month, or that accelerates, is not air.
Warm patches, and why cold spots are usually something else
A discrete area of floor that stays noticeably warmer than its surroundings, particularly when the system is off or when the room has reached temperature and the loop should have closed, is a meaningful sign. Water escaping from a pressurised loop keeps arriving at that point regardless of what the controls are doing.
Cold spots are the opposite and are much more often a circulation problem than a leak. Air trapped at a high point in a loop, a loop that has never been balanced properly, an actuator that has failed closed on a manifold port, or sludge restricting flow will all produce a cold area, and none of them involve water leaving the system. If the pressure is stable and the floor has cold areas, the problem is almost certainly flow rather than escape. Our guide to underfloor heating cold spots covers that diagnosis separately.
Damp at the perimeter and in adjacent rooms
Screed spreads water laterally. A leak in the middle of a room will often present as damp at the skirting, at a door threshold, or through the ceiling of a room below and to one side, because the water travels along the screed until it meets an edge, a service penetration or a joint in the substrate. The wettest point is where the water arrived. It is not the leak.
Wet and electric systems are different problems
Electric underfloor heating uses a resistance cable or mat and contains no water, so it cannot leak. When an electric system fails it does so as a break in the cable or a fault to earth, diagnosed with insulation resistance and continuity testing rather than with any leak detection equipment, and located with thermal imaging of the energised circuit. If a property has damp floors and electric underfloor heating, the water is coming from somewhere else entirely and the heating is a coincidence.
Wet systems circulate water from the boiler or heat pump through loops of barrier pipe, usually laid in screed, sometimes in grooved panels over a joisted floor or in a floating build-up. Those are the systems this article concerns, and the construction type has a large effect on both how the leak behaves and what the repair involves.
Where underfloor heating leaks actually originate
Properly installed, a wet underfloor loop is a single continuous length of pipe from the manifold, around the room and back, with no joints buried anywhere. That is deliberate: a buried mechanical joint is a future leak waiting for a thermal cycle to find it. Consequently, most failures are not failures of the pipe at all.
The manifold and its connections
The manifold carries the highest concentration of joints in the whole system: compression or push-fit connections to every loop, flow meters, actuator ports, isolation valves, filling and drain points and an automatic air vent. It is also the only part that is accessible, which makes it the first thing to check and the easiest thing to fix. Water in a manifold cupboard does not necessarily mean the loops are sound, but it very often explains the entire pressure loss on its own.
Mechanical damage during or after installation
This is the dominant cause of failures in the buried pipe itself, and it is why leaks often appear either very early in a system's life or immediately after unrelated building work. A pipe nicked by a trowel or a screed rake before the pour, crushed by a wheelbarrow wheel, or drilled through years later by someone fixing a kitchen unit, a stair rail, a radiator bracket or a floor-fixed partition will fail at that exact point. A sudden leak in a system that has run faultlessly for years almost always has a recent building work explanation.
Corrosion and water quality
Barrier pipe is specified for underfloor heating precisely because it resists oxygen ingress, which would otherwise corrode the steel components elsewhere in the system. Where non-barrier pipe has been used, or where the system water has never been treated, corrosion concentrates at the metal parts rather than in the plastic loops, so the manifold and the boiler suffer before the floor does.
| Origin | Typical cause | How it presents |
|---|---|---|
| Manifold connections | Compression or push-fit joint relaxing with thermal cycling | Visible water in the manifold cupboard, steady pressure loss |
| Manifold air vent or fill point | Passing valve or vent stuck open | Slow loss with no dampness anywhere in the floor |
| Loop pipe in screed | Mechanical damage before the pour | Fails early in the system's life, one loop only |
| Loop pipe in screed | Drilled or nailed through during later work | Sudden onset years later, traceable to recent building work |
| Loop pipe over a joisted floor | Fixing driven through a grooved panel or spreader plate | Localised damp and often a visible ceiling stain below |
| Buried joint from a previous repair | Mechanical joint left in screed against good practice | Repeat failure at or near a previously repaired area |
| Non-barrier pipe in the loops | Oxygen ingress corroding steel components elsewhere | Failures at the manifold and boiler rather than in the floor |
Reading the symptom, then choosing the method
Underfloor heating produces a small, repeatable set of symptoms, and each one points at a different starting method. Working from the symptom rather than from the instrument is what keeps a survey short.
| Symptom | Most likely cause | Method that resolves it |
|---|---|---|
| Pressure falls steadily, floor looks and feels normal | Manifold connection, air vent or fill point | Visual inspection and isolation of the manifold alone |
| Pressure falls and one area of floor stays warm when the system is off | Loop failure beneath that area | Thermal imaging of the isolated loop, confirmed by tracer gas |
| Pressure falls with no warm patch, floor is carpeted | Loop failure masked by the floor covering | Tracer gas, since the camera cannot read through deep underlay |
| Damp at skirtings or a threshold, pressure stable | Not the heating: a plumbing, roof or damp problem | Moisture mapping and separate mains and heating isolation tests |
| Cold areas of floor, pressure stable | Air, an unbalanced loop, a failed actuator or sludge | Manifold balancing and venting, no leak detection required |
| Sudden pressure loss soon after building work | Pipe drilled, nailed or screwed through | Establish what was fixed and where, then image and gas test that area |
| Stain on a ceiling below a heated floor | Loop failure above, or a plumbing failure sharing the void | Isolate the loops and watch, before opening any ceiling |
Proving which loop has failed
The manifold is the diagnostic instrument. Before any camera or gas is used, the system is broken down and tested in parts, because narrowing from a whole floor to one loop removes most of the search area at no cost.
- Record the standing pressure, then close the flow and return isolation on every loop and observe the manifold alone. Loss here places the fault at the manifold, not in the floor.
- Open one loop at a time, pressurise, and watch. The loop that will not hold is the failed one.
- Compare against the flow meter positions and the loop schedule, if the installer left one, to identify which area of floor that loop serves.
- Where a leak is confirmed, isolate that loop and leave the remaining loops in service, which usually keeps the heating usable while the repair is arranged.
- Record every reading with the time it was taken. Pressure behaviour over hours is the evidence, and a single reading proves nothing.
It is worth noting what good installation practice should already have produced. BS EN 1264-4 requires the loops to be pressure tested before the screed is poured, with the system left under pressure through the pour and the curing period so that any damage caused during those stages is revealed immediately rather than discovered in the first heating season. Where that test certificate exists, it establishes that the pipework was sound when it was buried, which narrows the cause of any subsequent failure to something that happened afterwards.
Pinpointing the leak through the screed
Having identified the loop, the task is to find the point within it and open the floor once rather than several times.
Thermal imaging is the first tool, and underfloor heating is the application it suits best. Running the suspect loop hot while the adjacent loops stay closed maps the pipe route across the floor as a series of warm lines. A leak shows as a diffuse warm area that breaks the pattern, and the contrast between the regular loop spacing and the irregular patch is what makes the reading. Its limitation is floor covering: thick carpet, deep underlay and some engineered timber build-ups flatten the image, and a stone or tiled floor reads far better. Thermal imaging is used here to define an area for confirmation, not as the final word.
Tracer gas is what confirms it. The loop is drained and charged with a hydrogen and nitrogen mixture. Hydrogen is small enough to migrate up through screed, tile grout lines and floorboard gaps, and a surface detector traces it to a concentration peak. This is the method that works when there is no useful temperature difference, when the floor covering defeats the camera, or when the leak rate is too low to produce a readable thermal signature. For a screeded floor, tracer gas detection is normally the step that decides exactly where the floor is cut.
Acoustic listening has a narrower role here than on a mains supply. A heating loop at operating pressure is comparatively quiet, and plastic pipe transmits the noise of escaping water poorly. It is used as corroboration where conditions allow rather than as the primary method.
Moisture mapping runs throughout, with surface and depth readings taken across a grid so the extent of the wetting is recorded. This matters for the drying strategy afterwards as much as for the location work, because a screed that has taken on water needs to come back down before any floor finish is reinstated over it.
What decides which of these leads is almost always the floor build-up rather than the leak itself, and each method has conditions under which it will not work. Stating those honestly at the survey stage is what prevents a second visit.
| Floor construction | Method that usually leads | Known limitation |
|---|---|---|
| Screed with tile or stone finish | Thermal imaging, confirmed by tracer gas | Stone with high thermal mass is slow to show the pattern |
| Screed with engineered timber | Tracer gas, with thermal imaging as support | The timber layer flattens the thermal image considerably |
| Screed with carpet and thick underlay | Tracer gas | Thermal imaging is effectively blind through deep underlay |
| Grooved panel over joists | Thermal imaging, then lift boards | Rarely needs gas, because access is straightforward once located |
| Spreader plates between joists | Inspection from below where a ceiling allows it | Not possible where the ceiling below is finished and occupied |
| Floating build-up over insulation | Tracer gas | Water tracks laterally on the insulation layer, so damp is misleading |
| Any construction, leak rate very low | Extended pressure monitoring before any imaging | A very slow loss produces no readable thermal or acoustic signal |
What the repair actually involves
The construction dictates the work. In a screeded floor the finish and screed are cut back over a small marked area, the damaged section of pipe is exposed, and a section is cut out and replaced, with the joint made using a method appropriate to burying, or with the connection relocated so that no mechanical joint is left in the screed. The loop is then pressure tested again before anything is covered, for exactly the reason BS EN 1264-4 requires it the first time.
Over a joisted floor with grooved panels or spreader plates, access is usually far less destructive, because boards lift and the pipe is exposed without breaking anything. That is one of the few situations where the answer is genuinely straightforward once the location is known.
A survey report on an underfloor heating leak should leave you holding a specific set of things, and it is worth asking for them at the point of booking rather than afterwards.
- Which loop failed, identified against the manifold ports and the flow meter positions.
- The pressure readings that proved it, each with the time it was taken.
- What was eliminated, including the manifold, the remaining loops and the mains supply.
- The methods used in sequence, with the reason for moving from one to the next.
- A marked location on a floor plan or sketch, cross-referenced to the thermal and gas findings.
- Detection, repair and making good identified as separate costed items rather than one figure.
Two things routinely get underestimated. The first is drying: a screed that has been wet for weeks holds a great deal of water and needs to return to an acceptable moisture content before a timber or resilient floor finish goes back over it, or the finish will fail. The second is that the system water is lost in the repair, so the corrosion inhibitor goes with it. BS 7593:2019 expects the inhibitor to be replaced after any work that drains a system, and an in-line filter to be permanently installed, which applies as much to an underfloor system as to a radiator one. Where an insurance claim is involved, the detection, the repair and the making good should appear as separate costed items, which is how trace and access work is normally set out for an adjuster. Most buildings policies respond to a sudden escape of water rather than to gradual deterioration, so the dates on which the pressure loss was first noticed and first reported matter as much as the finding itself; our guidance on insurance leak claims sets out what an adjuster expects to see.
Where the leak has come through into a room below, the ceiling is a secondary damage question rather than part of the repair, and it should be recorded photographically before anything is removed. Our approach to underfloor heating leak detection across London is to establish the loop, pinpoint the point, and open the floor once.
How we help with this
If the article describes a problem you actually have, these are the visits that deal with it.
- our full guide to leak detection
How each method works and when it is the wrong tool for the job.
- underfloor heating leak detection
Loop by loop testing without lifting the whole floor.
- central heating leak detection
For a boiler losing pressure or a circuit that will not hold.
Frequently asked questions
How do I know if my underfloor heating is leaking?
Pressure is the reliable indicator, because the pipework is buried and cannot weep visibly. A sealed wet system should hold its pressure indefinitely once commissioned and vented, so repeated repressurising means water is leaving the circuit. Supporting signs include a discrete area of floor that stays warm when the system should be off, damp appearing at skirtings or door thresholds, or a stain on a ceiling below. Cold spots are usually a circulation or air problem rather than a leak, and the pressure will be stable.
Can an underfloor heating leak be found without digging up the whole floor?
Yes, and the manifold does most of the work before any equipment appears. Each loop isolates individually, so closing them all and then opening one at a time identifies which circuit will not hold pressure, reducing the search from a whole floor to one pipe run. Thermal imaging then maps that loop's route and highlights the irregular warm area, and tracer gas charged into the drained loop confirms the exact point. The floor is opened over a marked location rather than searched.
Which loop has the leak, and can I still use the rest of the heating?
Usually yes. Once the failed loop has been identified by isolating loops one at a time at the manifold, that single loop can be closed off at its flow and return while the remaining loops stay in service. The room or area served by the isolated loop will be unheated, but the rest of the system continues to work normally and stops losing pressure. That makes it realistic to arrange the floor repair properly rather than under pressure, particularly in winter.
Why did my underfloor heating suddenly start leaking after years with no problems?
Almost always because something was driven through the pipe. Underfloor loops are laid as a single continuous length with no buried joints, so the pipe itself rarely fails spontaneously. A sudden leak in a system that has run faultlessly points to recent work: a fixing for a kitchen unit, a stair rail, a radiator bracket, a floor-fixed partition or a threshold strip. Establishing what was fixed to the floor recently, and where, frequently narrows the search area before any detection work starts.
Does electric underfloor heating leak?
No. Electric underfloor heating uses a resistance cable or mat and contains no water at all, so it cannot be the source of a leak. When it fails, it fails as a break in the cable or a fault to earth, and it is diagnosed by insulation resistance and continuity testing and located by thermal imaging of the energised circuit. If a property has damp floors and electric underfloor heating, the water is coming from somewhere else and the heating is coincidental rather than causal.
What happens to the screed after an underfloor heating leak is repaired?
It has to dry before any floor finish goes back over it. Screed absorbs and holds a considerable amount of water, and laying timber, vinyl or a resilient finish over a screed that is still wet will cause that finish to fail. The moisture content is measured rather than judged by appearance, and drying is assisted where the timescale matters. The repair itself should also be pressure tested before it is covered, and the system's corrosion inhibitor replaced, since it was lost with the drained water.